How Could I Forget the hors d’oeuvres?

With all the planning for Thanksgiving dinner, I almost forgot to map out what we’ll be snacking on while the turkey roasts. After a few emails and phone calls, we’ve settled on a few easy classics from Hubs’ family holidays:

  • Shrimp Cocktail (with Real Homemade Cocktail Sauce – recipe below)
  • Crudite’ and
  • Olives

Fortunately, we got these items inserted into the Google Doc in time to print the shopping list. And, a last minute addition to the main menu because you can never have too many carbs: homemade Parker House Rolls. The recipe in Bon Appetit called to Hubs.

Who could resist? I am biting my tongue about the calories and unhealthy ingredient list (whoops) for this recipe, but I won’t stop Hubs from pushing forward on this initiative.

Getting back to the hors d’oeuvres, let’s talk about Real Homemade Cocktail Sauce. I am a fan of homemade condiments overall, and if you have the time, it is worth it. Making your own cocktail sauce/mayo/spice mix will have an impact on the final result and often make an everyday dish outstanding. It’s like going from good to great in 5 minutes. We made this homemade Cocktail Sauce at Christmas a few years ago and it knocked our socks off. It’s hard to take prepared cocktail sauce seriously after tasting this. Recipe courtesy of Mark Bittman, of course.

Real, Homemade Cocktail Sauce 

  • 1 cup ketchup
  • 1 tablespoon lemon juice (or red wine vinegar if you don’t have any lemons)
  • 3 tablespoons butter
  • 2 tablespoons prepared horseradish, or to taste
Combine the ketchup, lemon juice (or vinegar), and butter in a small saucepan and cook over medium-low heat, stirring occasionally, until the butter melts. (At this point, you can keep the sauce warm for over an hour — but keep the heat as low as possible.) Add horseradish to taste. And done! Serve with shrimp and crackers.

Read More http://www.epicurious.com/recipes/food/views/Shrimp-with-Better-Cocktail-Sauce-105609#ixzz2Ci54B3KJ

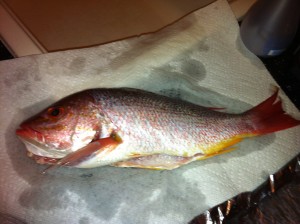
Whole, Roasted Snapper: Easy weeknight meal or disaster in the making?

As much as I enjoy eating whole fish, I almost never make it at home. My few attempts have been on the grill during the summer (with Hubs’s grilling skills), which led me to the sentiment above: easy-peasy weeknight dinner, or disaster in the making?

Nemo

When I stopped by the fish counter this morning, I had every intention of buying white fish fillets, but nothing looked great or reasonably priced, and then the whole red snapper caught my eye. Why not? I’d roast it simply in the oven with some fresh herbs, lemon, garlic and olive oil. Easy, right? And to hedge my bets, I also picked up salad and a few russet potatoes to prepare as a side dish. If the fish elicits any moans, the crispy, roasted potatoes will neutralize them.

In my head, I had figured out the ingredients, but I did a little research to double check cooking temperature and times. I will loosely follow this recipe from Anne Burrell.

Whole Roasted Red Snapper

1 (2 pound) fish, such as snapper or bass, scaled, gutted and gills removed
Kosher salt
Extra-virgin olive oil
8 lemon slices
2 fresh bay leaves
1 bundle assorted fresh herbs, such as thyme, oregano, marjoram and parsley, plus some extra to lay the fish on while baking
4 cloves garlic, smashed
1 cups dry white wine

Preheat the oven to 400 degrees F.  Using a sharp paring knife, make 3 diagonal slices about 1/2-inch deep on each side of the fish. Salt and olive oil the fish generously.  Season the inside of the fish with salt and olive oil. Place 4 lemon slices, the bay leaves, a bundle of the mixed herbs and 2 of the garlic cloves inside the body cavity.

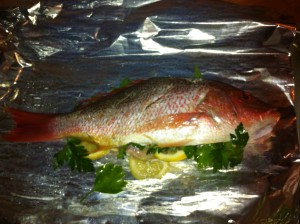
Ready for the oven: Red Snapper dressed with lemon, herbs, and garlic

Line a sheet tray with aluminum foil and arrange the remaining assorted herbs, lemon slices and garlic in the center of the tray and lay the fish on top.

Fold the aluminum foil up around the sides of the fish to create a sort of baking dish. Add the white wine and place in the preheated oven and roast until the fish is just cooked through, about 30 to 35 20-25 minutes.

Remove from oven, and allow to rest for 5 minutes. Fillet your fish tableside or at the kitchen counter. Drizzle fillets with olive oil and additional salt and pepper as needed. Happy Eating.

Will report out tomorrow: easy peasy or weeknight disaster. Stay tuned

My No-Knead Bread Needs Some Work

I finally attempted Mark Bittman and Jim Lahey’s much touted No-Knead Bread Recipe. I used the 4 ingredients as instructed in the recipe (flour, instant yeast, salt and water), letting the dough rise untouched on my countertop for about 14 hours (instructions advised 12 – 18 hours). The dough was really more of a batter when I turned it out on the work surface and it was with great difficulty that I turned the “blob” into itself. It would have been impossible to knead, even if I had wanted to do so. I had to wash and flour my hands several times to move the blob around the work surface.  Despite the loose batter, it did have a great yeast-y bread aroma and I was optimistic. I dutifully followed the instructions, letting it sit for another 15 minutes, then wrapping it in a towel for another 1-2 hours. I checked out Breadtopia’s site and modified recipe, too. Breadtopia suggested 1 1/2 cups water vs. Bittman’s 1 5/8 cups (which is a hard to measure quantity, to boot). I think my dough/batter had too much liquid.

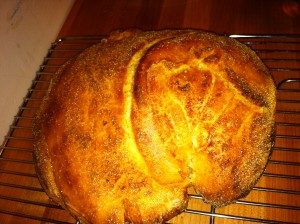
No-Knead Bread fresh from the Oven

After the final rising period, I turned my still blob-like dough into the heated Le Creuset dutch oven and placed in the oven for 30 minutes covered. As an aside, my dutch oven does not get enough use, so I am always excited to put it to work (along with my biceps when lifting it in and out of the oven!) When I removed the cover, I was excited to see a bread-like loaf had indeed formed. Maybe this was going to work out after all…

I let it cool on a wire rack for several hours and then placed it in a paper bag overnight. The bread did have an attractive crust and color, and definitely looked homemade. But the uneven height concerned me. Had my dough risen sufficiently? What is wrong with this picture, I wondered?

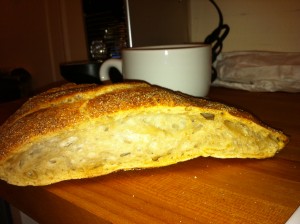
No-Knead Bread or Focaccia??

We tested the bread for breakfast yesterday morning. It took a little work to cut into the super crusty exterior, even with a sharp serrated bread knife. Points for a crisp crust, I thought. The interior was airy, too, but there just wasn’t enough of it. The 1 1/2 – 2 inch height was more like that of focaccia, than a traditional boule. We ate a few slices plain, untoasted, and the bread had good bite and flavor, but as Hubs aptly noted, the crust:bread ratio was off. Mind you, this bread was still infinitely edible, and there were no complaints from baby Sam. A decent first attempt, but definitely not a fool-proof recipe. I look forward to trying again.

Have you tried this bread recipe before?

Homemade Edamame Kale Quinoa Inspired by the Specialty Foods Counter

They say never to go grocery shopping when you’re hungry. I was so tempted to load up on prepared foods yesterday at Guido’s Marketplace in Great Barrington, but used my limited will power to stave off the urges. Guido’s Quinoa Edamame Salad (pictured below) looked divine  on an empty stomach. I liked that kale was one of the ingredients – it basically makes any recipe healthy in my book – and edamame, too (super food + protein). I nearly ordered a large container when I remembered that I had a bunch of kale in my CSA pick-up, and since it had been frosty, it needed to be prepared pronto.  Hold up, wait a minute, I was going to prepare this from scratch. I snapped a picture to capture the ingredient list (thank you, Guido’s) and hurried to the check-out counter.

Tempted: Quinoa Edamame Salad @ Guido’s Marketplace

While I unloaded the cart, I started making my mental map of prep steps.  I didn’t know the quantities, or the preparation instructions, but I was willing to wing it, even work under pressure as my belly was grumbling.  The first step would be to cook the quinoa (brilliant, I know). While the quinoa cooked, I’d prepare the vegetables and herbs (edamame, kale, parsley) and whip up the dressing. Mind you, these are all assumptions that I made.

I did a quick search online to confirm the cooking time for quinoa and found a great tip fromThe Kitchn blog. While boiling the quinoa, add a whole clove of garlic and a branch of rosemary to add an additional layer of flavor.  I loved this – the quinoa simply prepared like that tasted good enough to eat. But I powered forward, and to cut to the chase, the dish turned out great. If I had had more foresight, I’d have asked for a sample of Guido’s, so I would have had a taste benchmark as well. But, for a visual comparison, you can see my dish below. Not bad on the eyes, and pretty darn good on the palette. Recipe below photo for the adventurous.

Craving satisfied: Edamame Kale Quinoa Salad

Ingredients:

1 cup dry quinoa
2 cups water or broth
3 cloves garlic peeled, 1 smashed, the other 2 cloves minced
1 sprig of rosemary (optional)
1 tablespoon lemon juice
5 tablespoons olive oil
1 cup of edamame (if frozen, prepare according to package)
1 bunch of kale or tuscan kale, center ribs removed
1/2 cup of flat leaf parsley, washed and chopped
1-2 dried chili peppers (optional)


Instructions:

Rinse the quinoa well. Put the quinoa and water or broth in a small saucepan, add 1 clove smashed garlic and sprig of rosemary (if using), and bring to a boil. Cover and simmer for 15 minutes until all water is absorbed. Fluff with fork and let cool.

While quinoa is cooking, steam kale for 2-3 minutes. Remove from steamer with tongs and chop roughly. Place kale, chopped parsley, and edamame in mixing bowl. In a smaller bowl, prepare the dressing by combining remaining garlic, lemon juice, salt and pepper and chilis (if using). Whisk in the olive oil, and adjust seasoning as needed.

Once quinoa has cooled, add to bowl with vegetables and drizzle salad dressing over it. Stir gently to combine. Serve immediately, or store for 1-2 days.

Yield: 6-8 servings